|
Using the Update Manager is the preferred way of installing the RMI Plug-in for Eclipse. The steps below will guide you through the
installation process. You can also watch the installation flash
movie.
|
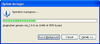
- Select "Help -> Software Updates -> Find and
Install..."
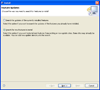
- In the "Install/Update" dialog box, select "Search for
new features to install" and press "Next".
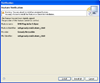
- On the next page, add a new remote site and enter the following
information:
Name: RMI Plug-in for Eclipse v2.0
URL: http://www.genady.net/rmi/v20/install/
Press "Finish" to continue.
For RAD/RSA6.0 and other products based on Eclipse 3.0 the update location is http://www.genady.net/rmi/v20/update_e30/
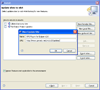
- Eclipse will now search for the latest plugin version. The
results are displayed in the "Updates" dialog box.
|
(2. click to enlarge)
(3. click to enlarge) |
- In the "Updates" dialog box, check the "RMI
Plug-in for Eclipse v2.0" category. Expand the category to verify
that the latest version of the plugin is checked and press
"Next".
If you don't see the latest version of the plug-in,
try downloading the plugin as ZIP file).
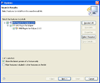
- Read and accept the license agreement.
- Press "Finish" to start downloading the latest version
of the RMI Plugin for Eclipse.
|
 (5. click to enlarge)
 |
 (7. click to enlarge)
 |
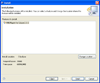
- The download will take a few moments, depending on the speed of
your internet connection.
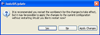
- You will be prompted to verify the (unsigned) downloaded
feature. Press "Install All" to continue.
- Finally you will be prompted to restart Eclipse. Press
"Yes" to restart, even if you are prompted to "Apply Changes".
- That's it, you have the RMI Plugin for Eclipse installed. You
may need to reset the perspective ("Window->Reset
Perspective") to make the "RMI Registry Control"
button to appear.
|
 (8. click to enlarge) (8. click to enlarge)
 (10. click to enlarge) (10. click to enlarge) |
 (9. click to enlarge)
 |
)
)
) (5. click to enlarge)
(5. click to enlarge)) (7. click to enlarge)
(7. click to enlarge)) (9. click to enlarge)
(9. click to enlarge)